
Box Dieline Generator
The Structure workspace turns a box style and three inner measurements into a flat, dimensioned dieline, with board thickness, bleed and glue flap applied for you.
- Workspace
- Structure
- Box styles
- Five
- Units
- Millimetres, inner L × W × H
- Account
- Not needed
This is the live editor. Your project stays open when you move between DielineDock pages.
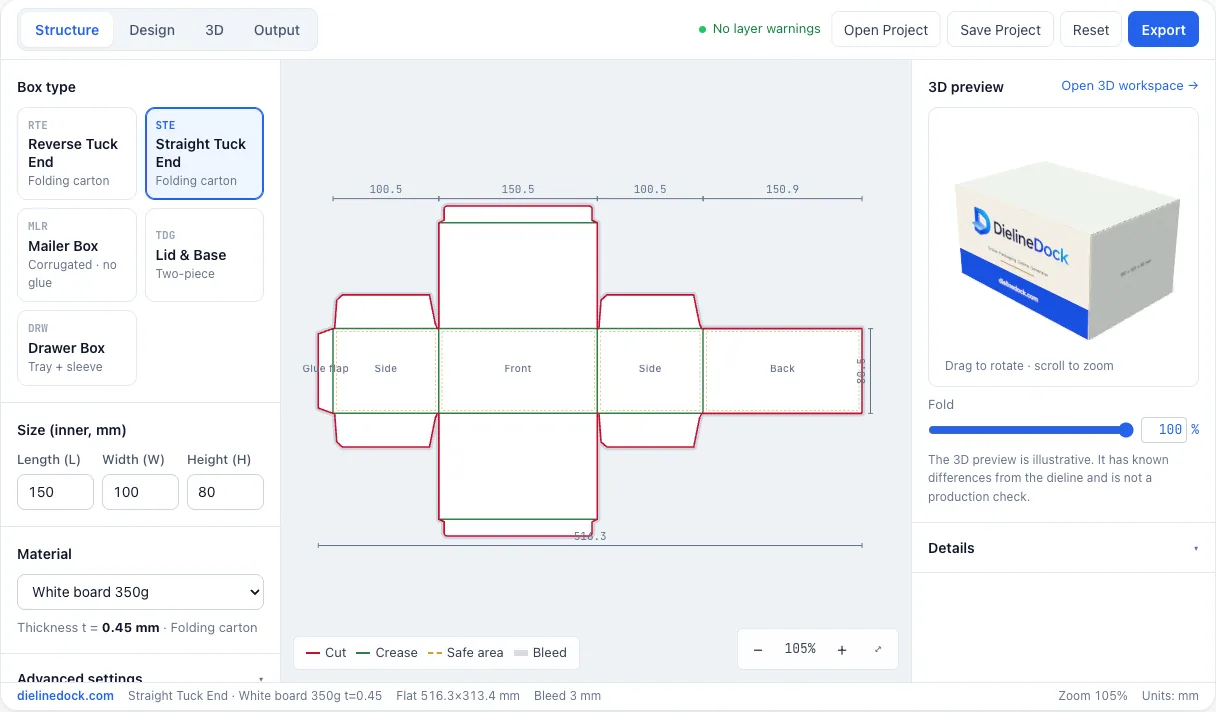
Choose a box style
The style decides how the box opens, whether it is glued and how many pieces you print.
- Straight Tuck End: one-piece carton, both lids on the front panel.
- Reverse Tuck End: top lid on the back panel, bottom lid on the front.
- Mailer Box: hinged lid, folded-in ears, no glue.
- Lid & Base: a base tray and a separate lid.
- Drawer Box: an inner tray inside an outer sleeve.
Enter inner dimensions and pick a material
Dimensions describe the inside of the finished box: length 20 to 600 mm, width and height 15 to 600 mm. The sample box is a Straight Tuck End at 150 × 100 × 80 mm.
Materials set board thickness, from 0.22 mm light coated paper to 3.0 mm B-flute; the default is white board 350g at 0.45 mm. Thickness is compensated automatically. On a tuck end carton, panels become W+t, L+t, W+t and L+2t wide and H+t tall.
Set bleed and glue flap
Bleed defaults to 3 mm and ranges from 0 to 10 mm. Each material shows a recommended bleed: 3 mm for paper and board, 5 mm for corrugated. The glue flap defaults to 14 mm and ranges from 8 to 30 mm.
Read the flat dieline
Each overlay can be toggled, and you can zoom, pan and fit the drawing.
- Red lines are cuts.
- Green lines are creases, where the board folds.
- The dashed line marks the safe area for text and logos.
- The bleed band shows how far artwork extends past the cut.
- Dimensions and panel names label the layout.
Edit line types and use the Details panel
Turn on Edit line types and click any line to switch it between cut and crease. The Details panel lists flat size, flat size with bleed, panel widths, and cut and crease length with segment counts, handy for quotes. A small live 3D preview sits beside the dieline.
The check before production list (closed outline, no self-intersections, cut spacing of 1.5 mm or more, creases joining two panels, bleed) is manual, not automatic.
How to make a dieline
- 1Open the Structure workspace and choose a box style.
- 2Type the inner length, width and height in mm.
- 3Pick the material that matches your board.
- 4Adjust bleed and glue flap if your printer asks.
- 5Review cut and crease lines and switch any that need it.
- 6Check the Details panel. On Starter or Pro, save a .boxproj project file.
Frequently asked questions
Can I enter dimensions in inches?
No. DielineDock works in millimetres only, so convert your measurements first.
Is my dieline checked automatically for production?
No, those checks are manual. Use the checklist and have your printer confirm the dieline.
Can I download the dieline as SVG, DXF or PDF?
SVG and DXF are not offered. After you sign in with an email code, you can export a PDF from the Output workspace; Free includes one watermarked RGB Review PDF. On Starter and Pro you can also save a .boxproj project file.
Do I need an account?
No. You can build and preview a box, and open .boxproj project files, without signing in; projects are files on your device. You sign in with an email code to export a PDF. Saving .boxproj project files is part of Starter and Pro.