
Bleed and safe area: keeping artwork clean on a folded box
Cutting and folding are never perfectly exact, so packaging artwork needs margins in both directions. Bleed extends the design past the cut line, and the safe area keeps important content away from it. This guide explains both, along with creases, and shows how the Design warnings help.
- Default bleed
- 3 mm, adjustable 0–10 mm
- Paper and board
- 3 mm recommended
- Corrugated (F, E, B flute)
- 5 mm recommended
- Image warning
- Below 300 dpi at printed size
Who this guide is for
This guide is for designers and product owners preparing artwork for a box, especially anyone used to flat print. On a box, a slight shift during cutting can leave a thin unprinted edge, and a slight shift during folding can push a line of text around a corner. Planning bleed and safe area prevents both.
Core concepts
The cut line is the finished edge, where the die cuts through the board. The crease line is where the board is scored so it folds.
Bleed is artwork that extends beyond the cut line. If the sheet or die shifts slightly, the background still runs to the edge instead of showing bare board. Any colour or image that touches a cut edge should continue into the bleed.
The safe area is the zone inside the cut and crease lines where important content belongs: logos, product names, ingredients, barcodes and legal text. Keeping them inside it protects them from being trimmed or pushed onto the next panel.
Bleed size depends on the material, because thicker boards are harder to cut and fold precisely. In DielineDock, paper and solid board materials (light coated paper 200g, coated paper 300g, white board 350g and 400g, kraft board 350g) recommend 3 mm. F-flute micro corrugated, E-flute and B-flute corrugated recommend 5 mm. The default is 3 mm and you can set 0 to 10 mm. Your printer's requirement always takes priority.
Creases need their own margin. Board can crack or shift slightly at a fold, so small text or fine detail across a crease may break or misalign. Backgrounds can run across a crease; small type should not.
Practical steps in DielineDock
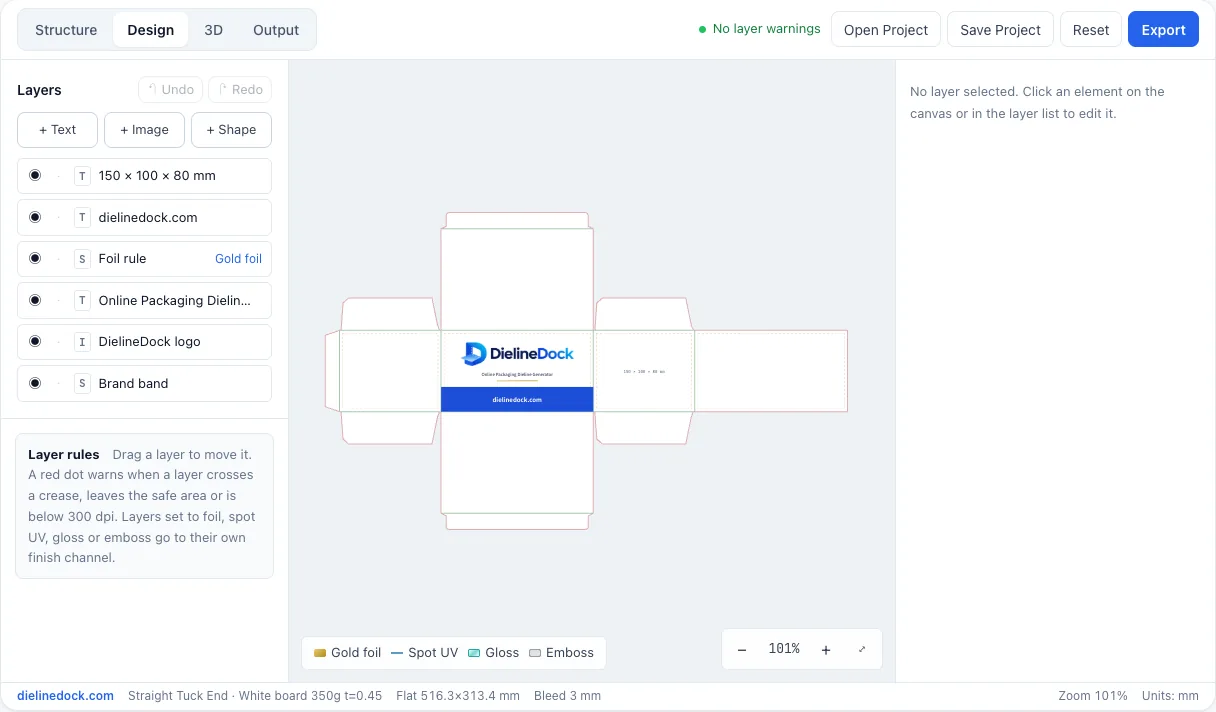
- 1In Structure, choose the material and set the bleed to its recommendation or to your printer's specification.
- 2Turn on the bleed band and the dashed safe area on the canvas.
- 3In Design, extend background colour blocks and images to the outer edge of the bleed on every cut edge.
- 4Place text, logos and barcodes inside the safe area of the correct panel, using align to panel to position them.
- 5Watch the warnings: DielineDock flags a layer that crosses a crease, a layer that leaves its panel or safe area, and an image below 300 dpi at its printed size.
- 6Fix each warning, or confirm it is intentional, such as a background meant to wrap around the box.
- 7Review the folded box in 3D. On Starter or Pro, save the project as well.
Common mistakes
- Stopping the background exactly at the cut line, leaving no bleed.
- Using 3 mm bleed on corrugated board when 5 mm is recommended.
- Putting small text or a barcode across a crease.
- Placing important content on flaps that are hidden once the box closes.
- Ignoring a low-resolution warning because the image looks fine on screen.
- Assuming the warnings catch everything. They cover layer placement and image resolution, not the structure itself.
Frequently asked questions
Is 3 mm bleed always enough?
It is a common default for paper and folding board, and it is what DielineDock recommends for those materials. Corrugated boards are recommended at 5 mm. If your printer specifies something different, follow the printer.
Is the safe area the same as the panel edge?
No. The safe area sits inside the cut and crease lines with a margin, so content has room for small cutting and folding shifts. DielineDock shows it as a dashed outline.
Can artwork run across a crease?
Backgrounds and patterns often do, and DielineDock warns you so you can confirm it is intentional. Keep text, logos and barcodes off creases.