
Straight Tuck End Box
The straight tuck end is the classic one-piece folding carton and the sample box that opens when you start DielineDock. Both closures tuck in from the same face, giving a simple fold sequence.
- Pieces
- One
- Glue
- Glue flap, default 14 mm
- Best for
- Light retail products
- Default size
- 150 × 100 × 80 mm
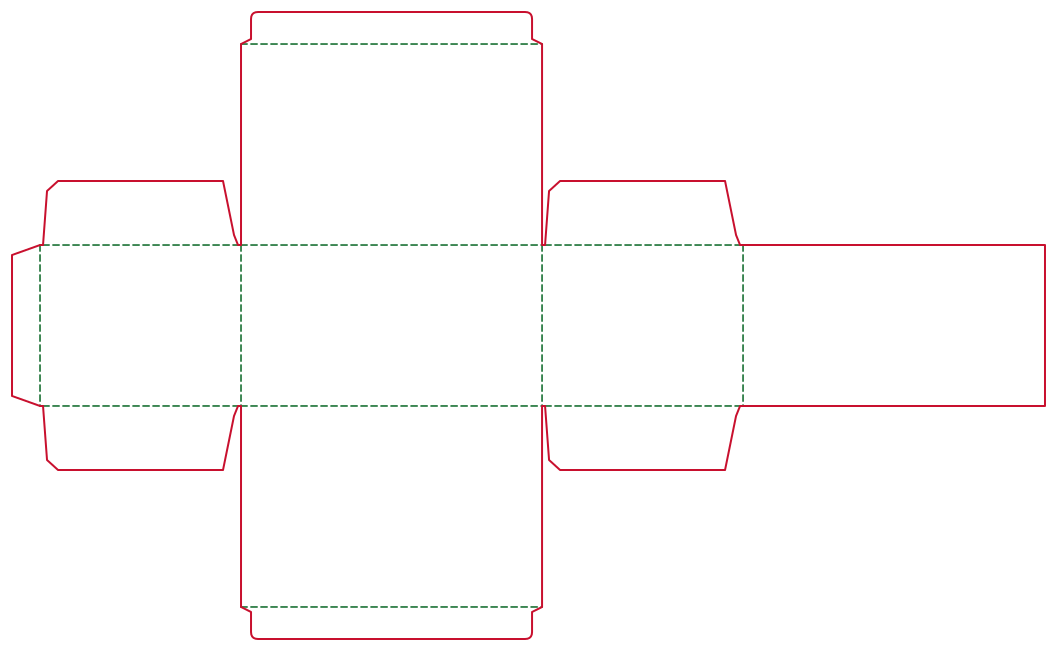
What a straight tuck end box is
A straight tuck end (STE) is a glued tube of four panels closed at top and bottom by tuck lids. Each lid ends in a tongue that slides inside the box and holds by friction.
How the structure is built
The body runs side, front, side, back, then a glue flap. In DielineDock both tuck lids, top and bottom, attach to the front panel edge, and the side panels carry dust flaps. Tuck tongue depth is the smaller of 16 mm and 0.55 × W; dust flap depth is the smaller of 0.75 × W and 32 mm.
Products it suits
Light, self-contained products taken out from the top: skincare and cosmetics, supplements, tea, candles and small accessories. It is also a good first project for learning how dielines work.
Strengths and limitations
It is efficient: one piece, one glue seam and a familiar fold sequence, with both closures opening from the same side. On the other hand, a tuck closure holds by friction only, so heavy or dense products may push it open. For heavier contents, a mailer or thicker board is often a better fit.
Dimension notes
Enter inner L × W × H in mm. Board thickness t is added per panel: widths W+t, L+t, W+t and L+2t, height H+t. The 150 × 100 × 80 mm sample in 350g white board (t = 0.45 mm) gives panels of 100.45, 150.45, 100.45 and 150.9 mm and a height of 80.45 mm. At W = 100 mm the tongue is 16 mm and dust flaps 32 mm; narrower boxes get shorter ones.
Suitable materials
Folding boards suit tuck ends best: white board 350g (default) or 400g, coated paper 300g, or kraft board 350g. Light coated paper 200g fits very small items. Corrugated grades are usually too thick for neat tucks.
How to create it in DielineDock
- 1Open the editor; the Straight Tuck End sample loads by default.
- 2Replace 150 × 100 × 80 with your inner dimensions.
- 3Choose your board from the material list.
- 4Check bleed (3 mm for board) and glue flap (14 mm).
- 5Review cut and crease lines and the Details panel.
- 6Place artwork in the Design workspace.
How to preview and export
Use the fold slider in the 3D workspace to watch the lids tuck in. The model is illustrative, so judge artwork placement there, not fit. To export, open the Output workspace and press Export; Free includes one watermarked RGB Review PDF. On Starter or Pro, you can also save a .boxproj file.
Frequently asked questions
Why are the panels larger than my measurements?
Your inputs are inner dimensions. DielineDock adds board thickness so the inside of the folded box matches what you typed.
Why are both lids on the front panel?
That is how this tool builds an STE. If you want lids on opposite faces, choose Reverse Tuck End.
Can I make the glue flap wider?
Yes. It defaults to 14 mm and can be set from 8 to 30 mm. Ask your printer what their gluing line prefers.
Can I use corrugated board for a tuck end?
You can select it, but thick corrugated makes tucks stiff and bulky. Test any unusual combination with a physical sample.