
Reverse Tuck End Box
The reverse tuck end shares the straight tuck end's one-piece glued body, but its two lids open from opposite faces. That changes how lid artwork must be placed.
- Pieces
- One
- Glue
- Glue flap, default 14 mm
- Best for
- Light cartons with a back-hinged top
- Default size
- Set your own
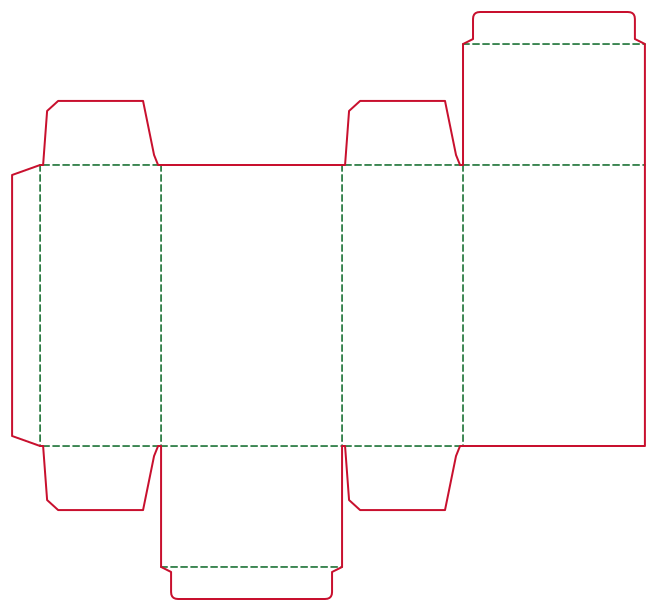
What a reverse tuck end box is
A reverse tuck end (RTE) is a four-panel folding carton glued along one side and closed by tuck lids at each end. Unlike a straight tuck end, one lid hinges from the back and the other from the front.
How the structure is built
The body matches the STE: side, front, side and back panels, a glue flap, and dust flaps on the side panels. In DielineDock the top lid attaches to the back panel and the bottom lid to the front panel, so the lids open from opposite faces.
Products it suits
Light retail goods such as cosmetics, stationery or accessories. Choose it when you want the top lid hinged at the back, so it opens away from someone facing the front.
Strengths and limitations
You keep the STE's simplicity, one piece and one glue seam, with a top lid that opens away from the front face. The trade-off is orientation: top-lid artwork must sit upside-down on the flat to read correctly when closed, which is easy to get wrong. Like any tuck closure, it may open under heavy contents.
Dimension notes
Inputs are inner L × W × H in mm. The body follows the STE rule: panel widths W+t, L+t, W+t and L+2t, height H+t. A 120 × 40 × 160 mm carton in 400g white board (t = 0.5 mm) gets panels 40.5, 120.5, 40.5 and 121 mm wide and 160.5 mm tall. Because the lids hang from different panels, they sit diagonally opposite on the layout, changing the flat outline.
Suitable materials
Use folding boards: white board 350g or 400g, coated paper 300g or kraft board 350g, with light coated paper 200g for small items. Corrugated grades are generally too thick for neat tucks.
How to create it in DielineDock
- 1Open the editor and choose Reverse Tuck End.
- 2Enter your inner length, width and height in mm.
- 3Pick a folding board.
- 4Keep or adjust bleed and glue flap.
- 5Confirm the top lid sits on the back panel.
- 6Place artwork, checking the top lid's orientation.
How to preview and export
Play the fold in the 3D workspace and stop as the top lid closes to confirm its artwork reads upright. The preview is illustrative, not exact. To export, open the Output workspace and press Export; Free includes one watermarked RGB Review PDF. On Starter or Pro, you can also save a .boxproj file.
Frequently asked questions
What is the difference between STE and RTE?
The body is the same. On the STE both lids attach to the front panel; on the RTE the top lid attaches to the back panel, so the lids open from opposite faces.
Why does top-lid artwork look upside-down on the flat?
The top lid hinges from the back panel and folds forward, so its artwork must be upside-down on the flat to read correctly when closed. Confirm it in the 3D fold.
Is there a default size for RTE?
No. The 150 × 100 × 80 mm sample belongs to the Straight Tuck End. Enter your own inner size.
Can I change a cut into a crease?
Yes. Turn on Edit line types and click a line to switch it. Check any change with your printer.