
Mailer Box
The mailer is a one-piece, corrugated-style box with a hinged lid and walls that lock without glue. Reach for it when the box must travel as well as look good on opening.
- Pieces
- One
- Glue
- None
- Best for
- Shipping, subscription, e-commerce
- Default size
- Set your own
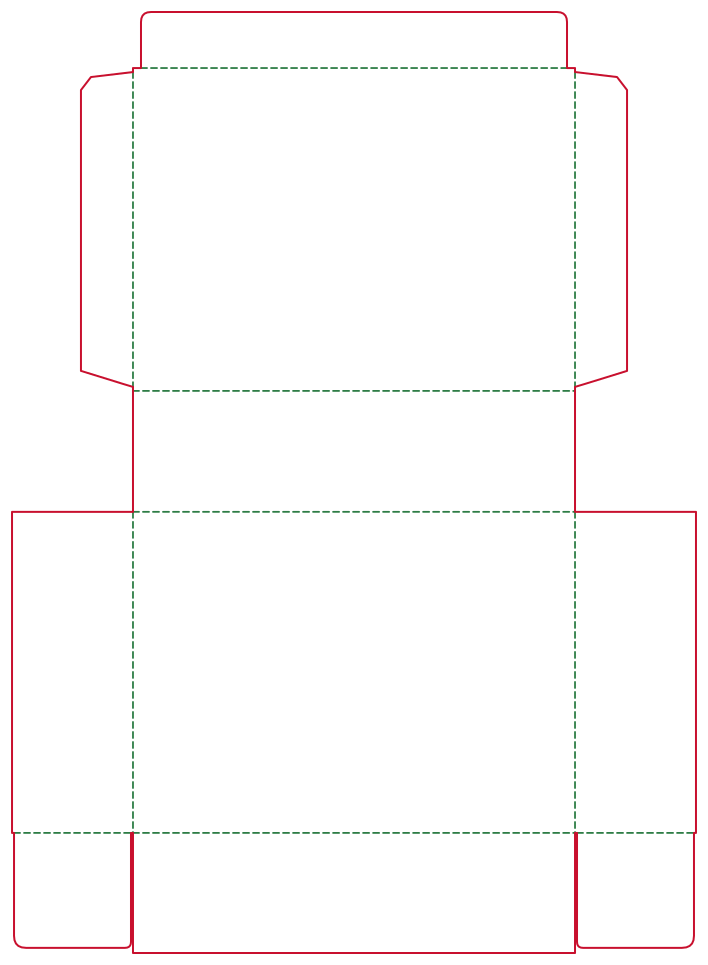
What a mailer box is
A mailer is a flat sheet that folds into a tray with an attached lid. It is assembled by folding alone, so it can be built by hand without a gluing line.
How the structure is built
The layout centres on the base. The back wall rises from it and carries a hinged lid ending in a tuck flap. The front wall folds up opposite, and the side walls fold up with ears that turn inward to lock the corners. There is no glue flap.
Products it suits
Products that are posted or gifted: subscription kits, clothing, books, small electronics and e-commerce orders where the unboxing matters. The flat base also works as a presentation tray.
Strengths and limitations
Strengths: no glue, sturdy walls in corrugated board, and a lid that opens like a book with generous print areas. Limitations: the flat layout is larger than a tuck carton of similar size because lid, walls and ears come from one sheet, and thick boards need careful sizing so the lid closes cleanly.
Dimension notes
Enter inner L × W × H in mm. Thickness matters more because mailers use thicker boards: side walls are H+t and the lid width is W+3t. In E-flute (t = 1.5 mm), a 250 × 180 × 60 mm mailer gets 61.5 mm side walls and a 184.5 mm wide lid. In B-flute (t = 3.0 mm) that becomes 63 mm and 189 mm. Corrugated grades recommend 5 mm bleed rather than 3 mm.
Suitable materials
Corrugated grades are the natural match: F-flute micro (0.8 mm) for a crisp, light mailer, E-flute (1.5 mm) as an all-rounder, and B-flute (3.0 mm) for heavier contents. White board 400g or kraft board 350g can suit small presentation mailers.
How to create it in DielineDock
- 1Open the editor and choose Mailer Box.
- 2Enter the inner size your product needs.
- 3Select a corrugated grade or board.
- 4Set bleed to the recommended 5 mm for corrugated.
- 5Check flat size and cut and crease length in the Details panel.
- 6Place artwork on the lid and walls in the Design workspace.
How to preview and export
Use the fold slider in the 3D workspace to watch the walls rise and the lid close, and try the natural kraft preset. The model is illustrative and approximates flaps. To export, open the Output workspace and press Export; Free includes one watermarked RGB Review PDF. On Starter or Pro, you can also save a .boxproj file.
Frequently asked questions
Does a mailer box need glue?
No. The side-wall ears fold inward and the lid tucks in at the front, so it holds by folding alone.
Why did my flat size grow when I chose B-flute?
Thickness is compensated automatically. Side walls are H+t and the lid is W+3t, so a 3 mm board adds much more than a 0.45 mm board.
Which bleed should I use for a mailer?
Corrugated grades recommend 5 mm, and bleed can be set from 0 to 10 mm. Follow your printer's specification if it differs.
Is the mailer strong enough to ship?
That depends on board, contents and carrier. DielineDock does not test strength, so test a printer sample with your product.